
Introduction
In this blog post, we’ll explore an efficient method to set up domain names and valid TLS certificates for your homelab services without exposing them to the public internet. We’ll achieve this by using a reverse proxy and obtaining a valid certificate from Let’s Encrypt, a widely (and free) recognized Certificate Authority (CA).
Why using DNS in my homelab ?
I opted to purchase the domain name gothuey.dev from Infomaniak. While there are free alternatives available, such as Duck DNS. In my case, I’m going to do the set-up with a domain name purchased from Infomaniak.

The objective I’m striving for involves utilizing my domain directly – for instance, service.homelab.gothuey.dev (as seen with grafana.homelab.gothuey.dev). This approach empowers me to establish subdomains for various homelab services (Grafana, Jellyfin,.PairDrop,…). By doing so, each service gains a unique and easily recognizable identity, eliminating the need to rely on IP addresses and ports for access.
Keep in mind that the setup described in this guide is geared towards optimizing accessibility and organization within a local network context. All my services are not exposed outside my network.
Set up
Popular reverse proxies like Nginx, Apache, Swag, or Traefik are excellent choices for setting up in your homelab services. Consider selecting one that aligns with your preferences and suits your specific setup requirements.
In my scenario, I elected to employ Nginx Proxy Manager (NPM) due to its user-centric configuration process. This tool boasts an intuitive setup, rendering it an optimal choice for individuals who are either newcomers to reverse proxies or enthusiasts of a more simplified configuration journey. Of notable significance, NPM comes equipped with a feature that stands out: native support for Let’s Encrypt Challenge DNS-01, right out of the box.
1: Install Nginx Proxy Manager (NPM)
For my homelab, which primarily relies on Docker, we can easily install Nginx Proxy Manager (NPM) using the following docker-compose.yml configuration. To proceed, you can follow the steps outlined in the Quick Setup guide available at https://nginxproxymanager.com/guide/#quick-setup.
yaml
2: Set up a domain name (Infomaniak)
At your Infomaniak manager dashboard, choose the domain you want to use.
Select Change the DNS zone and then click on the ADD AN ENTRY button. Here, you can define how you want to design your domain name.
Create two entries as follows:
The first entry should be of TYPE A, which will point your domain to your private homelab IP address.
textType: ASource: homelab.gothuey.dev (replace by your domain name)target: 192.168.1.3 (replace by your private IP)TTL: 1 hourThe second entry should be of TYPE CNAME, enabling the creation of subdomains like
grafana.your-domain.comtextType: CNAMESource: *.homelab.gothuey.dev (replace by your domain name)target: homelab.gothuey.devTTL: 1 hour
After making the necessary DNS changes, it may take several minutes for your domain to become fully available. To check the availability and ensure the correct configuration, you can use the dig command. When the setup is successful, you should see your private homelab address associated with the A record for your domain.
shell
3: Issue a token for CertBot (Infomaniak)
As mentioned earlier, Nginx Proxy Manager has the capability to generate and manage TLS certificates for use. It utilizes the certbot-dns-infomaniak plugin behind the scenes, which necessitates a token from your Infomaniak dashboard for proper functioning.
- At your Infomaniak manager dashboard, to to the API section and generate a token with “Domain” scope.
- Keep this token somewhere safe as we will use it in the next step.
4: Add new certificate in NPM
- Go to Nginx Proxy Manager (http://192.168.1.3:81/) and navigate to the SSL Certificates tab.
- Click on “Add SSL Certificate” and select “Let’s Encrypt.”
- Configure your Let’s Encrypt Certificate as follows:
- Domain Names: Add the domain and subdomain records. -Enable the Use a DNS challenge option.
- DNS Provider: Select “Infomaniak.”
- Credentials File Content: Replace x values with the token issued in the last step.
- Click on the Save button to save the configuration.
If the configuration is completed successfully, you should be able to see your certificate.

5: Using DNS with services
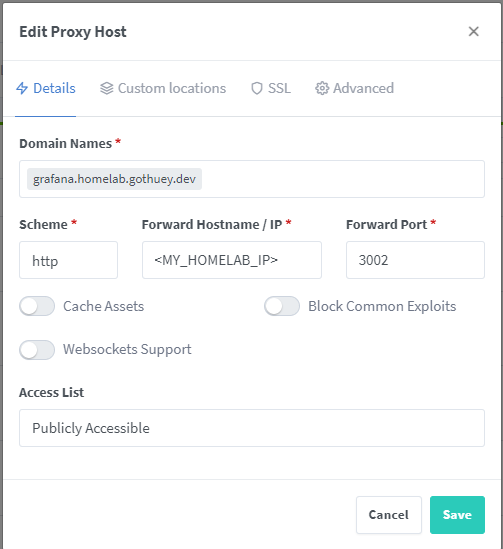
Now we are ready to set up a proxy entry. In my case, I would like to direct requests from my Grafana instance, grafana.homelab.gothuey.dev, to be redirected to http://HOMELAB_IP:3002.
- Begin by navigating to the “Proxy Hosts” tab and selecting “Add Proxy Host.”
- Configure your host (⚡Details tab)
- Domain Names**:
HOMELAB_SERVICE.your.domain.name - Scheme: http
- Forward Hostname / IP:
HOMELAB_IP - Forward Port:
SERVICE_PORT - Feel free to adjust other settings according to your requirements.
- Domain Names**:
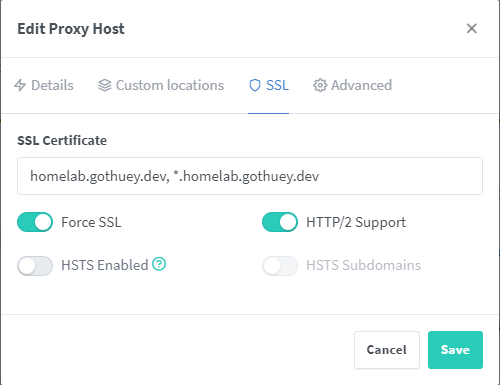
Next, proceed to the 🛡️SLL tab o choose an SSL certificate for this host:
- SSL Certificate: Choose the certificate that was created during 4: Add new certificate in NPM
- Enable Force SSL and HTTP/2 Support
- Finally, click on the “Save” button to apply these settings
6: Let’s test the set up
To confirm the proper functionality of our proxy setup, let’s conduct a straightforward test.
Open your preferred web browser.
In the address bar, enter the URL https://service.your.domain.name/ and then press Enter.
Upon completing the Grafana setup, my browser automatically redirected me to the Grafana instance situated at http:/HOMELAB_IP:3002. This seamless redirection granted me access to the Grafana dashboard without any SSL/TSL warning.

Final thoughts
This solution provides a straightforward approach for achieving DNS-based access and SSL/TLS encryption without encountering SSL warnings for your local services.
If you’re interested in a visual guide, I recommend watching the “Quick and Easy SSL Certificates for Your Homelab!” video on Wolfgang’s Channel. Although the video focuses on a similar setup using Duck DNS, the core principles align closely with what we’ve discussed here, offering an additional resource to guide you through the process.